The Data Model
The Data Model is the structure of records into which extracted data are stored. It contains the names and types of the fields in a record and in its detail tables. A detail table is a field that contains a record set instead of a single value. The Data Model is shown in the Data Model pane, filled with data from the current record.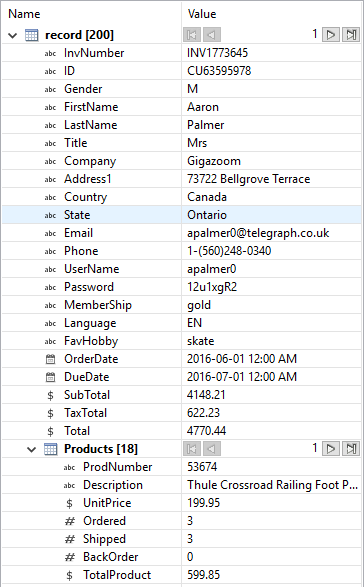
The Data Model is not related to the type of data source: whether it is XML, CSV, PDF, Text or a database does not matter. The Data Model is a new structure, designed to contain only the required data.
About records
A record is a block of information that may be merged with a template to generate a single document (invoice, email, web page...) for a single recipient. It is part of the record set that is generated by a data mapping configuration.
In each record, data from the data source can be combined with data coming from other sources.
Records can be duplicated by setting the number of copies in a script (see record). Duplicates are not shown in the Data Model.
Creating a Data Model
A Data Model is created automatically within each data mapping configuration, but it is empty at the start. To fill it you could use another Data Model (see Importing/exporting a Data Model) or start creating a data mapping workflow (see Data mapping workflow).
To learn how to add and edit fields, see Fields.
Importing/exporting a Data Model
To use a Data Model in another data mapping configuration, or to use it in a Designer template without a data mapping configuration, you have to export that Data Model and import it into a data mapping configuration or template.
Importing and exporting Data Models is done from within the Data model Pane, using the top-right icons ![]() and
and ![]() .
.
For information about the structure of the exported Data Model file, see Data Model file structure.
When you import a Data Model, it appears in the Data Model pane where you can see all the fields and their types.
Instead of a Data Model file, you can import a JSON file, or a Connect file that contains a Data Model. The file's data model structure will be displayed in the Data Model pane.
You can delete or add fields, or change their type. Once the Data Model is imported and all the fields are properly set, all you need to do is extract the information from the active data sample (see Extracting data).
-
Imported Data Model fields always overwrite existing field properties when the field name is the same (although they will still be part of the same Extract step). Non-existent fields are created automatically with the appropriate field settings. The import is case-insensitive.
-
All imported data model fields are marked as required in the Data Model (indicated with an asterisk (*) next to their names). This is to prevent them from being removed, as the DataMapper immediately discards non-required fields that are not referenced by any Extract step.
Editing the Data Model
The Data Model is generally constructed by extracting data; see Extracting data.
There is however another way to modify the Data Model: via the contextual menu that opens when you right-click on something in the Data Model pane. For an explanation of the options in this menu, see Data Model contextual menu.
As long as a field or data table, added via the Data Model pane, remains empty, it can be edited (renamed, deleted etc.) via the contextual menu.
Fields in a Data Model that are actually used in the extraction workflow cannot be edited via the Data Model pane. They are related to a step in the extraction workflow and are edited via the Step properties pane instead.
The order of the fields can also not be changed via the Data Model pane. It is the Extract step that determines the order in which data are extracted, so the order of the fields has to be changed per Extract step.
To learn how to edit fields and change their order, see Fields.
Using the Data Model
The Data Model is what enables you to create personalized templates in the Designer module.
You can drag & drop fields from the Data Model into the template that you are creating (see Variable Data). For this, you have to have a template and a data mapping configuration open at the same time, or import a Data Model (see Importing/exporting a Data Model).
The Data Model is reusable, meaning that it can be shared amongst different template layouts and output types.
Different data mapping configurations could use the same Data Model, allowing a template to be populated with data from different sources and formats, without the need to modify the template (see Importing/exporting a Data Model).
In Workflow, when a data mapping configuration is used to extract data from a data source (see Data mapping configurations), the extracted data is stored in a record set that is structured according to the Data Model.
Adding fields and data via Workflow
The Data Model is not extensible outside of the DataMapper. When it is used in Workflow - as part of a data mapping configuration - the contents of its fields can be updated but not its structure.
There are a number of instances however, where fields may need to be added to the data model after the initial data mapping operation has been performed. For instance, you might need to add a cleansed postal address next to the original address, or retrieve a value from a database and add it to the record.
ExtraData field
You can add empty fields in advance to provide space in the Data Model for Workflow to store data. For convenience, one field called ExtraData is automatically created at every level of each data record. That means the record itself gets an ExtraData field, and each detail table also gets one.
By default the field is not visible in the DataMapper's Data Model, because it is not meant to be filled via an extraction. It can be made visible using the Show ExtraData Field icon at the top of the Data Model.
Workflow process
Data can be added to the Data Model in a PlanetPress Connect Workflow process as follows:
-
Use an Execute Data Mapping task or Retrieve Items task to create a record set. On the General tab select Outputs records in Metadata.
-
Add a value to a field in the Metadata using the Metadata Fields Management task.
Data added to the _vger_fld_ExtraData field on the Document level will appear in the record's ExtraData field, once the records are updated from the Metadata (in the next step).
Other fields have the same prefix: _vger_fld_. -
Update the record/s from the Metadata. There are several ways to do this. You could, for example:
-
Use the Update Data Records plugin.
-
Add an Output task and check the option Update records with Metadata.
-
Select Metadata as the data source in the Create Preview PDF plugin.
-
Many of these actions can also be performed using REST calls.
Please refer to PlanetPress Connect Workflow documentation for more information about the plugins involved.